How To: Diagnose a Check Engine Light (CEL) on 240SX
Filed Under (Diagnostics) by Michael Pica on 15-07-2008
Tagged Under : CEL, Check Engine, Consult, Diagnose, ECU, How To, Maintenance, MIL, OBDI
So maybe you’re driving along and the Orange Check Engine Light (CEL) pops on (OHS NOES!) or maybe you bought a 240sx and the light was already on and you’re wondering why… Well it’s not very difficult nor very hard to find out. Nissan made it easy and I’m going to show you how you can check it yourself. This method actually works for nearly all Nissans (including Maxima, Altima, etc, even those with SR20s and JDM Computers) but I’m going to walk through the process for a factory spec S14.
OBDII – The easy way out
First of all if you’ve got a 96 or Newer 240sx (or other car) then you can use the OBDII (On Board Diagnostics V2) Port found below the Steering wheel, any auto parts store should be willing to plug in and read the code for you. Make sure you wright down the actual code provided so you can search for more detailed information online… they might tell you “what it means” at the store but their description might be too vague to be useful.
Consult – The other easy way out
If you’ve got a 1995 or older 240SX (or other Nissan) Then chances are you’ve got a Nissan “Consult” port available. this is similar to an OBDII port but specific to Nissan cars and should be available on both domestic and foreign models. The port is located on the drivers side behind the fuse door on the kick panel. You’ll see a narrow gray connector, you can buy (or even build) your own consult cable to interface with a laptop, maybe you know someone who owns one, or maybe you can convince your Nissan dealership to scan your car for free. If you plan on doing diagnostic work on your car in the future it’s probably worth the investment to get one.
Counting Blinks – the CHEAP way out
If your car is too old for OBDII and don’t have access to a Consult cable, then fear not, you can still figure out what that CEL means with little more than a couple of simple tools and some spare time. Nissan was kind enough to install an LED on the Engine Control Module (ECM) that will blink to tell you what the CEL means. The only problem is that you need to get to the ECM and partially remove it to see this LED.
Tools you’ll need:
- A 10mm Nut Driver (or socket+extender or deep socket)
- A small flat screw driver
- keys to your car
Step 0: Preparation
Park your car in a location where you have plenty of room on the passengers side so that you can open the door fully, also ensure that the ground in this area is dry (since you’ll be kneeling here a lot) and that you’re not going to get rained on or anything like that.
Step 1: Remove the Plastic bits
Start by sliding the passengers seat all the way back and take out the floor mat and put it on the ground just outside of the door (it gets in the way and you can kneel on it to keep your knees comfy).
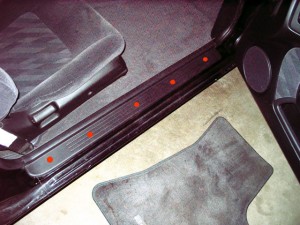
Starting at the end towards the back of the car start pulling up gently on the plastic door sill. There should be 5 snaps (marked below by red dots), gently pull up on this piece and pop the snaps one at a time from back to front. Be careful once you’ve removed the piece as the snaps can easily fall out of the sill and you wouldn’t want to lose them.
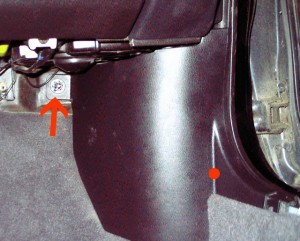
Once you’ve got the sill off you can remove the kick panel. The kick panel has a plastic nut on the back (marked below by the red arrow) you should be able to remove this with your fingers just like you were removing a regular nut. Once the nut is removed there is a metal clip (marked below by the red dot), pull gently on the kick panel towards the inside of the car to pop this clip. Once it has been popped the kick panel should slide off towards the back of the car.
Step 2: Detaching the ECM
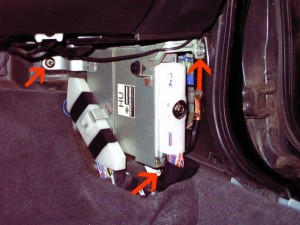
Once you’ve uncovered the ECM you will need to unbolt it from the car. Don’t worry you wont need to unplug it nor do you need to disconnect your battery. There are 2 10mm screws and 1 10mm nut that need to be removed (marked below by the red arrows). Remove all three of them.
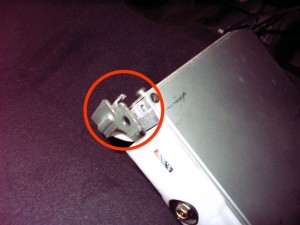
Once you’ve got the screws and nut removed your ECM might still feel like it’s stuck in place. That’s because there is a small hook on the bracket where the top screw was, you will need to push up on the ECM slightly and then pull it out towards the back of the car. You can see the hook below to know what I’m talking about. I actually ended up removing the dashboard screw immediately above the hook so that I could move the corner of the dash slightly to give me more room. That screw is also 10mm.
Step 3: Reading the ECM Codes
Once you’ve got the ECM un-attached you might realize you can’t move it much with all the cables attached, the LED is actually on the side facing the front of the car.
To move it in a position where you can easily see the LED do the following:
- Starting with the ECM in the same general position as if it were bolted swing the top down as if you were opening the cover of a book sitting on it’s spine.
- Then from that position grab the end toward the front of the car and swing it towards you as if you were closing the hood of a car. You should end up with the ECM in the position below.
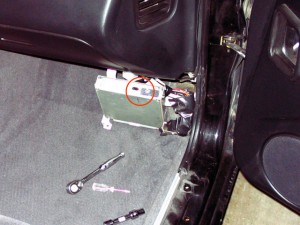
The circle In the photo above highlights the red LED (on the left side) and a small set screw (on the right side). The code wont be blinking just yet, you will need to ask the ECM to show you the code.
To get the code from the ECM do the following:
- Put your key in the ignition and tun the key to the “ON” position but DO NOT START THE CAR. You should see all of the lights on your instrument panel light up, including your CEL.
- Next take your little screw driver and use it to turn the set screw in the ECM completely CLOCKWISE
- wait a few seconds (I’ve heard you’re supposed to see some blinks here but I’ve never seen them on my car)
- Turn the set screw completely COUNTER-CLOCKWISE
How to read the LED:
Now the LED should start blinking, you will it blink slowly a number of times, then pause for a second, then blink quickly a number of times, then pause for a second and repeat.
the code is the number of slow blinks followed by the number of fast blinks. So if I see 4 slow blinks and then 3 fast blinks then the code is “43” if I see 11 slow blinks then 5 fast blinks then the code is “115”. If there is more than one code then the LED will blink one code then the next then the next, until it has shown you all of the codes, and then it will repeat.
count the blinks several times to make sure you have the code correct and write it down so you don’t forget.
Once You’re Done:
Once you are done reading the codes you can rest your ECU by simply turning the set screw completely CLOCKWISE, pause for a second then turn it completely COUNTER-CLOCKWISE. This will clear the codes and return your ECU to normal operation. If for whatever reason you do not want to clear your codes you can simply leave the set screw as it is (it should be fully COUNTER-CLOCKWISE) and turn the key off while the codes are blinking away. I don’t know why you wouldn’t want to clear the codes though.
If you cleared the codes you can start up your car if you like and notice the lack of a CEL
You can, of course, put your car back together by reversing the steps you took to take it apart.
What do the Codes Mean?
These codes are for a KA24DE, they will be different for different Nissan motors.
| Code | Problem | FSM section |
| 11 | Camshaft Position Sensor | EC-88 |
| 12 | Mass Air Flow Sensor | EC-92 |
| 13 | Coolant Temperature Sensor | EC-97 |
| 14 | Vehicle Speed Sensor | EC-101 |
| 21 | Ignition Signal Primary | EC-105 |
| 25 | IACV-AAC Valve | EC-110 |
| 31 | ECM | EC-115 |
| 32 | EGR System | EC-117 |
| 33 | Front O2 Sensor | EC-125 |
| 34 | Knock Sensor | EC-130 |
| 35 | EGR Temp Sensor | EC-133 |
| 36 | EGRC-BPT Valve | EC-137 |
| 37 | Closed Loop | EC-139 |
| 41 | Intake Air Temp Sensor | EC-140 |
| 43 | Throttle Position Sensor | EC-145 |
| 65 | CYL 4 Misfire | EC-150 |
| 66 | CYL 3 Misfire | EC-150 |
| 67 | CYL 2 Misfire | EC-150 |
| 68 | CYL 1 Misfire | EC-150 |
| 71 | Random Misfire | EC-150 |
| 72 | TW Catylist System | EC-154 |
| 76 | Fuel Injection System | EC-157 |
| 77 | Rear O2 Sensor | EC-162 |
| 82 | Crank Position Sensor (OBD) | EC-167 |
| 84 | A/T Diag Comm Line | EC-171 |
| 95 | Crank P/S (OBD) Cog | EC-174 |
| 98 | Coolant Temperature Sensor | EC-178 |
| 103 | Park/Neutral Position Switch | EC-183 |
| 105 | EGRC Solenoid/V | EC-188 |
| 111 | Inhibitor Switch | AT |
| 112 | Vehicle Speed Sensor A/T | AT |
| 113 | A/T 1st Signal | AT |
| 114 | A/T 2nd Signal | AT |
| 115 | A/T 3rd Signal | AT |
| 116 | A/T 4th Signal or TCC | AT |
| 118 | Shift Solenoid/V A | AT |
| 121 | Shift Solenoid/V B | AT |
| 123 | Overrun Clutch S/V | AT |
| 124 | TOR Conv clutch SV | AT |
| 125 | Line Pressure S/V | AT |
| 126 | Throttle Position Sensor A/T | AT |
| 127 | Engine Speed Signal | AT |
| 128 | Fluid Temp Sensor | AT |
After Checking the Codes
So I went thought this process myself because my CEL came on. I checked it and it said my Front 02 sensor was bad (code 33). after resetting the ECM the CEL went away for a few weeks but it came back again. See the way the codes work is that the ECM has to detect the problem on more than one trip. So if you take a drive and it sees a problem you wont get a CEL until you take another drive and it sees the problem again.
Apparently the Front O2 Sensor dieing is a very common problem with the KA24DE. there are a few different types of O2 sensors depending on when you car was made (you must go by the manufacturing month and year, not the model year because they changed them mid-model year). My car being a 1995 model year manufactured before September of 1994 I use a 1 wire O2 sensor.
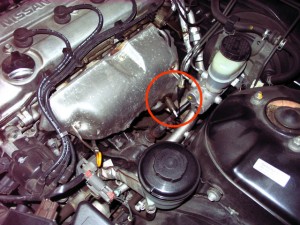
Locating the front O2 sensor is easy
Unplugging it and using some PB Blaster to loosen it up it came right off and the new one looked and fit exactly like the old. I would highly recommend replacing your O2 sensor with a new one should you have a similar problem since their life span isn’t exactly fantastic.
